Step 3: Configure double Opt-in
1. Overview
Many times businesses obtain consent to send messages via web forms, emails, or offline methods such as contracts. Many industry bodies and associations including the TCPA recommend confirming the opt-in via handset by sending an explicit SMS asking to confirm or at least notify the recipient that they are subscribed to the text message service from your business.
The consent status of the recipients is set to pending until they use this keyword to confirm the request. On receiving the keyword from the prospect, you send a response confirming the consent. This completes the compliance process.

The consent collection process can be automated. You can set up a process builder so that whenever a new lead is created you will be able to create a new record in the consent database.
This section helps you create the configuration for double opt-in or confirmation messages for opt-ins via manual or online forms. All consent will be captured based on these configurations.
2. To Create Double Opt-in Configuration:
1. In Double Opt-in & Others, click on the Create Configuration option. The Create New Configuration screen appears.

2. Enter the details as required. Refer to the following table for more details.
3. Click on the Validate and Save button. You will see the double-opt-in configuration created.
- Click on the Down icon next to the double opt-in record you want to view and click on the View Details button from the dropdown list.
- Click on the Down icon next to the double opt-in record you want to remove and click on the Delete button.


| Field | Description |
| Source | Select the non-handset source from which you want to create consent records. The current version provides Manual as the only available source. |
| Channel | Select the channel for which you want to create a double opt-in configuration |
| Confirmation Message Sender ID | Select the channel-specific Sender ID from which the confirmation message will be sent. |
| Send Confirmation Message | Select the option to send a confirmation message. |
| Opt-in Confirmation Message | For channel SMS, Type the confirmation message that will be sent out for an Opt-in request.For channel WhatsApp and Facebook, you will see a template selection drop-down. Create a template in Converse Template with Consent object selected and then configure it here. Refer to the guidelines given at the end. |
| Opt-out Confirmation Message | For channel SMS, Type the message that will be sent out to confirm an Opt-out request. This field will appear if you do not select the Double Opt-in option. For channel WhatsApp and Facebook, you will see a template selection drop-down. Create a template in Converse Template with Consent object selected and then configure it here. Refer to the guidelines given at the end. |
| Double Opt-in | Select the option to enable the customer to send a double opt-in. |
| Double Opt-In Message | For channel SMS, type the message that will be sent out to request for a double opt-in. This field appears only if you select the double opt-in option. For WhatsApp and Facebook, you will see a template selection drop-down. Create a template in Converse Template with Consent object selected and then configure it here. Refer to the guidelines given at the end. |
| Double Opt-in Keyword | Type the keyword that will be used for sending double opt-in requests. This field appears only if you select the double opt-in option. |
| Double Opt-in Confirm Message | Type the message that will be sent out to confirm a double opt-in request. This field appears only if you select the double opt-in option. |
3. Selecting a Template as Confirmation Messages
For WhatsApp:
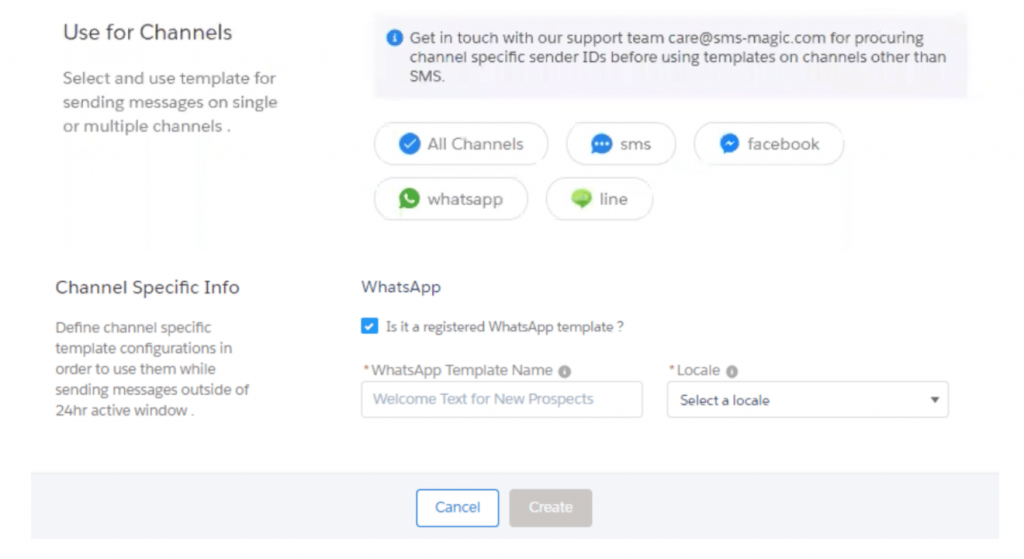
While configuring opt-in, opt-out confirmation, and double opt message, you will see a template selection drop-down. You will first have to create a template in Converse Template with the object selected as ‘Consent’, Channel tagged as ‘WhatsApp / All Channels’, and keeping the template text the same as the WhatsApp approved template text. You can then enter the details in channel-specific section fields. Once the template is created, you can configure the same here.


You can configure the same in double opt-in settings as shown below:

For Facebook:
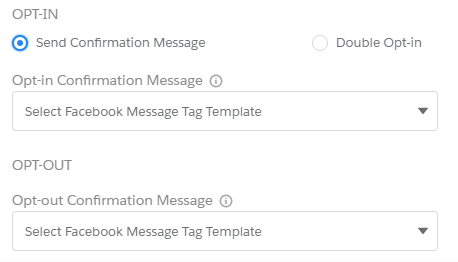
While configuring opt-in, opt-out confirmation, and double opt message, you will see a template selection drop-down. You will first have to create a template with an object selected as ‘Consent’, Channel tagged as Facebook / All Channels’ and keeping template text of your opt-out confirmation message text. You can then select a message tag as a ‘Confirmed event update’. Once the template is created, you can configure the same here.


You can configure the same in double opt-in settings as shown below:


